Some File Dont Upload to Autodesk Vault After Scan
Blueprint data can encompass many unlike types of files from CAD information to documents and spreadsheets. Autodesk Vault manages whatever data associated with your design projection. In improver to tracking CAD data files, the version history of supporting files tin can too be tracked.
You tin add whatsoever blazon of file to a vault. However, to add together CAD data files to a vault, use the add-in specific to the CAD awarding. The CAD-specific add together-ins rail the relationships between the CAD files.
CAD data cannot exist dragged and dropped into a vault.
In one case a file is transferred to the vault, the file in the vault becomes the master file. Information technology is a recommended do to delete the copy on your reckoner. When you lot want to view or edit the file, recall a copy from the vault by using the Become/Check Out command. This practice ensures that you are working with the latest version on your local calculator.
The file stored in the vault is the master copy of that file. Any files outside the vault are copies that accept been borrowed from the vault for viewing or editing.
Permissions
Roles with Permission to add files and folders to a vault.
| Role | Admission |
|---|---|
| Ambassador |  |
| Change Order Editor Level 1 (Autodesk Vault Professional) |  |
| Change Order Editor Level 2 (Autodesk Vault Professional) | |
| Content Center Administrator | |
| Content Center Editor | |
| Custom Object Consumer (Autodesk Vault Professional) | |
| Custom Object Editor Level 1 (Autodesk Vault Professional) | |
| Custom Object Editor Level 2 (Autodesk Vault Professional person) | |
| Custom Object Manager Level 1 (Autodesk Vault Professional) | |
| Custom Object Managing director Level two (Autodesk Vault Professional) | |
| Document Consumer | |
| Document Editor Level ane | |
| Document Editor Level two | |
| Document Manager Level 1 | |
| Document Manager Level 2 | |
| ERP Manager (Autodesk Vault Professional) | |
| Detail Editor Level 1 (Autodesk Vault Professional person) | |
| Item Editor Level 2 (Autodesk Vault Professional) | |
| Detail Reviewer (Autodesk Vault Professional) | |
Add Files to a Vault
To add CAD information files to a vault, use the add together-in specific to the CAD application. The CAD-specific add-ins rail the relationships between the CAD files. CAD data cannot be dragged and dropped into a vault.
Vault Customer
- Right-click the vault folder to which the file volition be added, and then select Add Files. A file browser is displayed.
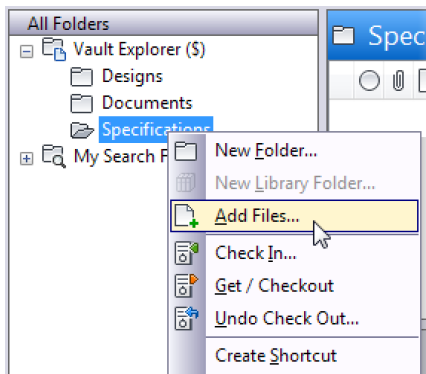
- Browse the local folders and select the files to add.
- Click Open. The Add Files dialog box is displayed.
- To keep the local file writeable so you can go on working on information technology afterwards calculation it to the vault, click Keep files checked out. You tin always check the file out afterwards if yous don't want to proceed the file checked out now.
- To remove the working copy when the file is added to the vault, click Delete working copies.
- Enter a comment to describe the files being added to the vault.
- Click OK. The selected files are added to the vault.
One time the file is added to the vault, the working copy tin be deleted. From this signal on, Autodesk Vault manages the data. When you want to view or modify a copy of the file, you call back a version of the file from the vault and check information technology out.
AutoCAD Vault Add-in
Files are added to a vault using the Check In, Check In All or Bank check In Binder command. DXF files that are inside the working binder tin also be checked in to a vault.
Use Check In for adding files to the vault for the start fourth dimension and to check in a file that you have checked out. Yous tin can automatically create a visualization file attachments when files are checked in.
AutoCAD drawing files that are exterior the working binder tin exist checked in from AutoCAD Mechanical. You are prompted that the file will be converted to an AutoCAD Mechanical drawing file. Click Yes to convert the file and continue with the check in procedure.
Annotation: You lot cannot accept two or more files with the same name in the same folder.
Apply the Check In Folder command to either add folders of existing legacy data to the vault in a single operation or to check in the contents of an entire folder all at once. For calculation a large quantity of files, for example, adding a legacy project, yous tin can check in a folder in non-interactive style. This lets you offset the bank check in process, and so turn your attention to something else as the files are added to the vault.
Utilise Check In All to add an AutoCAD Electrical project definition file forth with its list of drawing files to the vault in a single operation while establishing their location inside the vault.
Check Files into the Vault for the Kickoff Time
Note: AutoCAD Electric uses projection files (.wdp) that list all of the drawing files included in the project.
Unless y'all are checking in a host or project file that references other files, you can simply check in ane file at a time using the Check In command. Host and project files contain the saved paths to all files it references to resolve links and cross-references between the documents in the blueprint. When you add together host or project files, all dependent files are added automatically to the vault.
The Check In Folder command lets you add an unabridged folder and its recursive contents to the vault in a single operation. Utilise this command to add legacy or existing files to the vault all at once. The recommended best practise when first using Autodesk Vault with an AutoCAD application is to add your existing information using the Check In Folder command.
The Check In All command lets you add an AutoCAD Electrical project definition file along with its list of drawing files to the vault in a single operation while establishing their location inside the vault. The project definition file may accept one or many drawings that need to exist added to the vault forth with the projection file for the first time. Once the project and drawings accept been added to the vault, the drawing files are associated with this version of the project file. When you first cheque in a projection definition file, the version number is 1.
Host and project files and their dependents must be added to vault in a way that the vault can resolve the relationship betwixt the files. It is recommended that the referenced files be at the same level as the host or project file or below it to ensure a simplified workflow.
The Cheque In Settings dialog box gives y'all options for structuring your files in the vault and for automatically attaching visualization files to files as they are checked into the vault.
| Employ organized binder construction | places all files and folders under a single folder. The original folder structure is retained to the extent all referenced files be at the same level or beneath the folder the host file resides in. Files that are not located on the same level or higher up the host file are placed nether the host file automatically. |
| Place all files in one folder | flattens the unabridged binder structure and all files are placed at the same level as the top-level host or project file in the vault. The flatten command volition non proceed when two or more than file names are the same inside the same binder. |
These vault settings help ensure your information is organized in a way that is suitable for apply with the vault. Afterwards you check a blueprint into the vault using one of the options specified previously, anyone checking out those files brings the aforementioned binder structure down to their computer. When checking a design into the vault for the starting time time, the vault does the remapping. The saved paths for each xref are inverse, and so saved back to each file earlier checking that file into the vault. When checking a project into the vault for the first time where drawing files are relocated, the vault modifies the mapping within of the project definition file. This procedure ensures proper file resolution when the file and its xrefs are checked out of the vault, and subsequently checked back in.
When files located exterior of the working folder are added to a vault for the first time, they are copied to the working folder, the xrefs are updated for the new path, and then the files are added to the vault. The files are and so deleted from the original location outside of the working folder. You are prompted with a message that the original files volition be deleted from their original location before checking the files in for the first time. Click Aye to continue with the cheque-in process.
Note: If ane or more files cannot be checked in, then none of the files are deleted from the original location.
Cheque in a File (that is not an xref) for the First Time
Follow these instructions to check a non-external reference file into the Vaut for the beginning fourth dimension.
Note: Checking in an AutoCAD Electrical drawing automatically checks in the project.
- Open the file you want to check into the vault.
- Access the Bank check-in dialog box by using 1 of the following methods:
- In the Vault ribbon, click Check In.
- At the command line, blazonvltcheckin, and then press ENTER.
- In the Select Vault Location dialog box, select a vault binder to bank check the files into and click OK.
- In the Cheque In dialog box, specify if you desire to keep the file checked out for further editing or whether or not to delete the local copy of the file in one case it is checked in to the vault. Practice not turn on theShut files and delete working copies setting when checking in files if you are using a shared working folder. Deleting the working copy from a shared working folder may delete files accessed by other users.
- The Check In dialog box shows you where the files will be added to the vault and provides access to the Settings dialog box where you tin specify other options such equally automatically attaching visualization files when files are checked in.
- Click Settings to specify other options.
- Specify folder structure preferences in the File Locations box.
- Specify visualization attachment preferences in the Visualization Attachment Options box.
Note: The Chore Server must exist enabled prior to logging into the server for the Send to Job Server option to exist available. Any changes made to Job Server availability while the user is logged in will be visible one time the user logs out of the server and logs back in. See the Chore Server topic for more than data.
- Click OK to accept the settings and to return to the Cheque In dialog box or click Cancel to dismiss the settings and return to the Check In dialog box.
- Enter whatsoever notes in the comment box.
- Click OK to complete the check in and to close the dialog box or click Cancel to abolish the bank check into the vault performance and close the dialog box.
You tin can release your reservation on a file in the vault by using the Disengage Check Out command. At the command line, blazonUncheckout, and and so press Enter. You tin besides access this command by right-clicking the file in the External References palette, and so selecting Undo Cheque Out from the context menu.
Check in a Host and Its References for the First Time
When you lot check a host file into the vault for the first time, all the files information technology references are checked into the vault at the same time.
- Open the host file.
- Access the Bank check-in dialog box by using i of the following methods:
- In the Vault ribbon, click Check In.
- At the command line, blazonvltcheckin and press ENTER.
- In the Select Vault Location dialog box, select a vault folder to check the files into and click OK.
The Bank check In dialog box shows y'all where the files volition be added and provides access to the Settings dialog where you specify how to add the files.
- In the Check In dialog box, specify if you lot want to keep the file checked out for further editing or whether or not to delete the local copy of the file one time information technology is checked in to the vault. Exercise not turn on theClose files and delete working copies setting when checking in files if you are using a shared working folder. Deleting the working re-create from a shared working folder may delete files accessed by other users.
- Click Settings to specify how the files volition be added to the vault and other options such as automatically attaching visualization files when files are checked in.
- Specify how the files being added to the vault are to exist organized:
- Select Use organized folder structure to add the host file and all its referenced files to the vault under one peak level folder. The folder construction is maintained for all folders that are at the same level or beneath the host file. All referenced files and folders existing outside the directory tree of the Host are brought nether a unmarried folder.
- Select Place all files in ane folder to flatten all files and identify under one folder.
- Click OK to accept the settings and to return to the Check In dialog box.
- Click Cancel to dismiss the settings and return to the Bank check In dialog box.
- Specify how the files being added to the vault are to exist organized:
- Enter whatsoever notes in the annotate box.
- Click OK to consummate the check in and to close the dialog box or click Cancel to cancel the check into the vault operation and close the dialog box.
Check in Project Files and Their Dependents for the First Time
AutoCAD Electric uses project files (.wdp) that listing all of the drawing files included in the projection. When you lot cheque a projection file into the vault for the start time, all the files it references can be checked into the vault at the same time.
- Open the project in AutoCAD Electrical.
- Access the Cheque-in dialog box past using ane of the following methods:
- Select .
- In the Project Manager, right-click the projection name, and so select .
- In the Select Vault Location dialog box, select a vault binder to check the files into and click OK.
The Check files into the Vault dialog box displays the projection file and all its dependents. The Bank check In dialog box shows you where the files volition be added and provides access to the Settings dialog where you specify how to add together the files.
Note: Files used to support the project (such equally *.wdl and *.wdt) announced in the Vault Check In dialog box if they share the aforementioned file name as the project. These files cannot be deselected the first time files are checked in.
- In the Check In dialog box, specify if you want to keep the file checked out for further editing or whether or not to delete the local copy of the file once it is checked in to the vault. Do not turn on theClose files and delete working copies setting when checking in files if you are using a shared working folder. Deleting the working re-create from a shared working binder may delete files accessed past other users.
- Click Settings to specify how the files volition be added to the vault and other options such as automatically attaching visualization files when files are checked in.
- Specify how the files being added to the vault are to exist organized:
- Select Use organized folder structure to add the projection file and all its referenced files to the vault under ane top level folder. The folder construction is maintained for all folders that are at the aforementioned level or beneath the project file. All referenced files and folders existing outside the directory tree of the project file are brought under a single folder.
- Click OK to take the settings and to render to the Check In dialog box.
- Specify how the files being added to the vault are to exist organized:
- Enter whatsoever notes in the comment box.
- Click OK to complete the check in and to shut the dialog box or click Cancel to abolish the check into the vault operation and close the dialog box.
Check in Library Files for the Commencement Time
Boosted steps are required to associate a library file to a pattern file, so that a relationship is created between the design file and the library file. In AutoCAD or AutoCAD Mechanical right-click in the xref ESW, and select Attach from Vault. Select the Library file you lot desire associated with the active drawing. After placing the Library file in the drawing, right-click the host file, and then select Bank check In. A relationship betwixt the active drawing and the library file is now created.
Annotation: Library files are not currently stored in the vault for AutoCAD Electrical.
Library files tin can be checked out and edited only when they are opened directly from AutoCAD or AutoCAD Mechanical. A library file is not editable when information technology is attached every bit an xref to a host file. Utilise your Library folders to contain files you lot desire used in multiple designs.
Note: Library files can be besides be checked out in Autodesk Vault and then opened in the advisable program for editing. After editing, the library file tin can be checked back into the vault equally a new version.
Inventor Add together-in
Note: You lot must be assigned the role of either Editor or Administrator to perform this action. Contact your Vault administrator to verify your function.
Checking in files into the vault transfers files from your local working folder into the vault. When checking in files, steps are taken to ensure data integrity.
Before checking whatever files to the vault for the first time, make sure they conform to the rules for adding files to the vault.
- The workspace and all library folders which are referenced in the Autodesk Inventor model must be mapped to corresponding vault folders before files tin be added to the vault. Mapping the local folders referenced in the project to folders in the vault is necessary to maintain the project structure and the parent/child relationships.
- A file that is outside either the workspace or the library search paths and is dependent on an Autodesk Inventor model cannot be added to the vault.
When attempting to check in an Autodesk Inventor file that breaks i or more of these rules, an error is displayed indicating which dominion is existence cleaved.
Autodesk .dwf files can be created and attached automatically when files are added to the vault. The .dwf attachments are simply created for files that have changed or for files that do not have .dwf files published already. The paper clip icon is not displayed for automatically published .dwf files.
Attention: If you lot are using limited fashion, Inventor requires that you load all of the parts required for .dwf publishing before checking in an assembly.
The Check In Files for the First Time Procedure
- Files are added to the vault folders specified in the Map Folder dialog. The binder mappings are stored in the Autodesk Inventor project file then you do not have to select where files are to exist stored in the vault during each time you add files.
- If verbal copies of the files being added already exist elsewhere in the vault, yous are warned that the files will be duplicated.
- Earlier files are added to the vault, they are checked for conformity with the binder structure of the vault to make sure the relationships resolve correctly.
- Files are copied from your local workspace and libraries into the vault. It is important to notation that they are copied to the server and non removed from your local working folders.
- Afterwards files have been added to the vault, your local files are flagged as read-only. From this indicate on, the files must be checked out before editing.
- When adding Autodesk Inventor files using the Vault Cheque In for Autodesk Inventor, all parent/child relationships are maintained on the server. Having the vault shop these relationships makes it like shooting fish in a barrel for you to find where files are used and what the children of the files look like at whatever fourth dimension.
Check In Autodesk Inventor Files for the Offset Time
Any type of blueprint data tin can be stored in a vault including documents, spreadsheets, model files, and so on. Non-Autodesk Inventor files are added to the vault using Autodesk Vault. Autodesk Inventor files, notwithstanding, must be added to the vault using the Vault add-in for Autodesk Inventor to maintain the relationships betwixt the Autodesk Inventor model files. Files that are not vaulted are indicated by a question mark icon in the vault browser in Autodesk Inventor. Entire Autodesk Inventor projects can be added at once using Add Project.
Note: You must be assigned the office of either Editor or Ambassador to perform this activity. Contact your vault ambassador to verify your function.
Of import: Before adding Autodesk Inventor files to the vault:
- Open an Autodesk Inventor model.
- Log into the vault using the Vault add-in for Autodesk Inventor.
- Map the folders for the project to folders in the vault.
Cheque In Autodesk Inventor Files to the vault:
- From the Autodesk Inventor browser bar, select Vault. The Vault browser is displayed.
- Select the file that you lot want to check in. You tin can also select multiple files by pressing the Control or Shift keys.
- Right-click the selection, and then select Check In. The Cheque In dialog box is displayed. But the files that can exist checked in to the vault are listed.
- If necessary, select Go along files checked out to have the local files remain bachelor for editing as soon every bit they are added to the vault
- If you desire to add parents or children of the selected files, click Settings. You can also specify whether or not .dwf files are automatically created and attached to the files.
- Enter a comment describing the files existence added to the vault.
- Click OK.
Note: If an exact re-create of the file already exists elsewhere in the vault, you lot are warned that the files will be duplicated. Click OK to proceed with adding the duplicate files or click Cancel to close the dialog box and non add the files to the vault. If yous intend for the files to be used across multiple projects, either add the files to an existing library or add together the path of the files to the library paths listed in the project file.
When the Autodesk Inventor files are added to the vault, all the relationships are recorded besides. The status of each file is indicated by the icon next to the file name in the vault browser.
Add an Unabridged Inventor Project to the Vault
Annotation: To automatically add together an entire project (recommended), apply Autoloader: . Learn more about Autodesk Autoloader by clicking on Help. You tin manually add an entire Autodesk Inventor projection to a vault using Add Project. All drawings, parts, assemblies, and presentations for the agile projection are added to the vault at the same time, as well every bit any support files within the project structure such as documents and spreadsheets.
Autodesk Inventor project files that are non enabled for the vault cannot be added to the vault. The project file must exist vault-enabled and the project folders must exist mapped to vault folders before adding the project. Library files that have not been added to the vault are added every bit long as the library path in the project file is mapped to a vault folder. Library files are the simply files located outside the project structure that are added to the vault using the Add Projection control.
Each time the Add together Projection command is used for the active projection, the new files contained within the local projection structure that are not all the same in the vault are added to the vault.
Autodesk .dwf files tin exist created and fastened automatically when files are added to the vault. The .dwf attachments are only created for files that have changed or for files that do not have .dwf files published already. The newspaper prune icon is non displayed for automatically published .dwf files.
The Add Project control maintains the relationships betwixt the files existence added, including the following:
- Assembly files (.iam)
- Part files (.ipt)
- Drawing files (.idw, .dwg)
- Presentation files (.ipn)
The following files are not added to the vault when adding a projection:
- The Old Versions folder and all files contained within
- Other projection (.ipj) files inside agile project
- Lock (.lck) files
- Files that have already been added to the vault.
- .bak files
- .tmp files
The Add together Project dialog box adds all the related files in an Autodesk Inventor project to the vault at once while maintaining the project structure.
View the project files in a tree structure.
View the project files in a flat list.
Manually Add a Projection to the Vault
- On the Application Card select . If the vault folders have been mapped to the project, a progress bar is displayed indicating that the local files are being scanned for relationships. Later the files are scanned, the Add Project dialog box is displayed.
- Verify that the project structure is consummate in the file list.
- Click Settings to specify whether or not .dwf files are automatically created and attached to the files.
- Enter a annotate for the files.
- Click OK. A progress bar is displayed indicating that the files are beingness added to the vault.
Note: To automatically add the project (recommended), use Autodesk Autoloader: . Learn more most Autodesk Autoloader past clicking on Aid.
Note: Before manually adding an entire project to the vault, yous must have mapped vault folders to the project.
Revit Add-in
Utilize the Add Files command to add a option of files to the vault. Relationships between Revit files and associated files are created as new versions of the files are added to vault.
Note:
The Sharepath property should exist set in Vault before using the Add Files option.
Add Files with the Revit Add-in
- On the Vault ribbon tab, select Add Files.
- In the Open dialog select the files to add.
Notation: Adding more than 1,000 files may take a long time to process.
Note: When adding linked files using Add Files, all children files should be added before adding parent files.
- Specify whatsoever option changes. If a file is unchecked the file volition not be added to vault. The list view supports sorting by type and multi-select for efficient selection.
- Under Settings... you may enable or disable the visualization attachment for this session.
- The Target Location in Vault specifies the vault folder to which the selected folder is added. If the Share Path property has been configured, the vault path should be automatically set.
- Click OK. The selected content is added to the vault.
Note: You must be logged into the vault to add files.
Note: Meet Autoloader for information on bulk adding files and folders to a Vault.
Source: https://knowledge.autodesk.com/support/vault-products/learn-explore/caas/CloudHelp/cloudhelp/Help/ENU/Vault/files/GUID-B630E985-A7C6-4D58-ADAF-7EF69E464D85-htm.html
Postar um comentário for "Some File Dont Upload to Autodesk Vault After Scan"